Mail: [email protected]
Phone: +1(424)231-4091
Documentation
Everything you need to know about NexoPOS.
- Getting Started
- 0. Requirements
- 1. The Environment
- 2. Download And Build
- 3. Installation Wizard
- Components
- Accounting: Incomes & Expenses
- Cash Registers
- Customers
- Customers Group
- Expense History
- Expenses
- Expenses Categories
- Media
- Modules
- Numpad
- Order Types
- Orders
- Payment Types
- Procurements
- Product Categories
- Products
- Providers
- Reward System
- Stock Adjustment
- Table
- Taxes
- Taxes Groups
- Unit Groups
- Units Of Measure
- Base API
- Dashboard Widgets
- Hook System
- Role & Permissions
- NsMultiStore Api
- Make Jobs MultiStore Compatible
- Register Web & API Routes For MultiStore
- Updating Migrations
- Filters
- {namespace}-bulk
- {namespace}-catch-action
- {namespace}-crud-actions
- ns-crud-resource
- ns-dashboard-menus
- ns-dashboard-widgets
- ns-footer-signature
- ns-page-title
- ns-products-crud-form
- ns-products-history-operation
- ns-products-type
- ns-receipts-settings-tags
- ns-registers-allowed-payment-type
- ns-table-name
- ns-views:pages.sign-in
- ns-views:pages.sign-up
- ns-web-receipt-template
- ns.forms
- How To's
- Changing Domain
- Checkout Popup
- Database Configuration
- Email Configuration
- Enable Low Stock Notification
- Installing And Updating A Module
- Installing NexoPOS 4.x On Laragon
- Installing NexoPOS 4.x On Plesk
- Installing NexoPOS 4.x Using The cPanel
- Installing NexoPOS On Hostinger
- Link Nexo Print Server To NexoPOS 4.x
- Local Network Configuration
- Manage Customers On The POS
- Manage Sales Refunds
- Manual Module Installation
- Orders With Instalments
- Rebranding NexoPOS 4.x
- Translating NexoPOS
- Updating NexoPOS 4.x
- Using The Sales Filter
- Javascript API
- nsHttpClient
- nsNotice
- nsSnackBar
- Actions
- ns-crud-footer
- ns-dashboard-footer
- ns-dashboard-pos-footer
- ns-dashboard-settings-footer
- My NexoPOS
- Assign Print Jobs
- Cloud Print Setups
- Creating My NexoPOS Clients
- Deactivating Nexo Print Server 2.6 License
- Linking My NexoPOS To Envato
- Nexo Print Server 2.6.x License Validation
- NexoPOS 3.x License Validation
- Developpers Guides
- Add Create Button On <search-select/>
- Add Crud Entry Custom Action
- Add Crud Header Buttons
- Cart Custom Buttons
- Creating A Sample Hello World Page
- Creating Crud Components
- Creating Custom Pages
- Creating Custom Print Handler
- Creating Settings Page
- Dashboard Theming
- Database Migration
- Generating Modules
- Handle Crud Actions Using JavaScript
- Injecting Vue Component
- Model's Dependency
- Module's config.xml File
- Module's Routing
- Register Dashboard Menus
- Render Field As Vue Component
- Reset User Password With Tinker
- Service Provider
- Troubleshooting
- Broken Media Images
- Common Database Issues
- Conflicting Dashboard
- CSRF Token Mismatch On NexoPOS 4.x
- Disabling Modules Manually
- Environment Misconfiguration
- Gastro Empty Receipts
- Images Not Loading
- No Dashboard
- No Default Customer
- Products Not Appearing For Sale
- Products Not Showing On The POS
- Queues Jobs Are Disabled
- Using Nexo Print Server With SSL
- Gastro Guides
- Managing Modifiers
- Crud API
- Add Crud Entry Custom Action
- Creating Crud Components
- Declare Custom Crud Export Columns
- Handle Crud Actions Using JavaScript
- Header Buttons
- Method: beforeRenderForm
- Method: getView
- Nexo Print Server
- Configuration
- Javascript Actions
- ns-before-mount
- ns-pos-pending-orders-refreshed
- ns-settings-change-tab
- ns-settings-loaded
- Events
- CrudHookEvent
- SettingsSavedEvent
Creating Custom Print Handler
A printing handler is a service or a script used to manage printing. By default, NexoPOS comes with a default print handler which is the browser printing. However sometime, you might want to print differently an order. That technique was used by Nexo Print Adapter which inject on NexoPOS a new custom print handler.
This guide will share how to create your own print handler.
Requirements
Before creating a print handler, you need to be familiar with creating modules on NexoPOS. We really do not recommend you touch the source code. You should also know how to inject views on the footer.
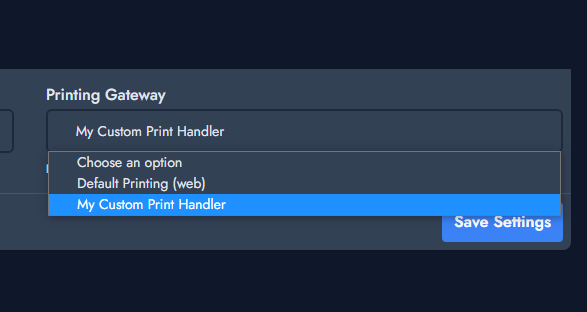
Add A New Option As A Printing Gateway
The first step is to register our customer print gateway. This will be made by adding on your ServiceProvider.php the following snippet.
This will inject the new option into the Printing settings.
Catching Print On The POS Screen
Now that we've created a new handler, we need to catch every print request submitted from the POS screen. We then need to inject a view on the footer of the POS. This can be made using the hook "ns-dashboard-pos-footer" and then by loading a view within the module Resources/Views directory.
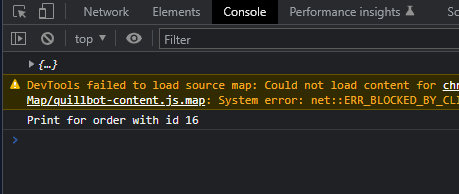
Now, we'll edit that file to catch custom print requests. This will be made using the javascript filter "ns-order-custom-print".
Now, every time we're printing with that custom print gateway selected, that log should appear on the console.
Next Step: Custom Implementation
The reason of providing a custom print handler is to be able to print as you desire. As you can see, you get the order id that you can use to perform an async request to retrieve either the default printing template:
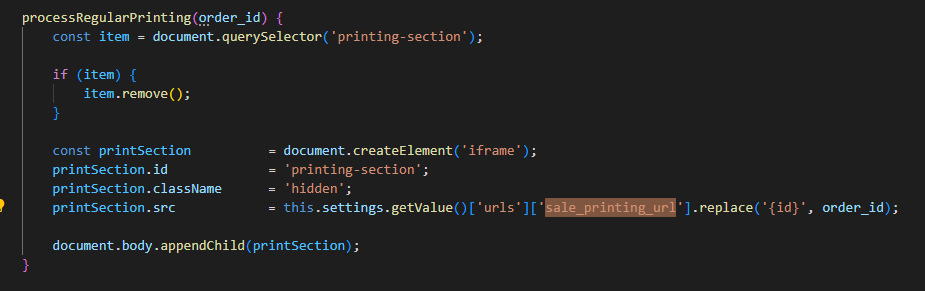
But you can also make custom calls to your modules API to retrieve the order details. Remember while loading users you can pull: customers, products, refund, payments, etc like this.
From there, you can basically do everything you want.