Mail: [email protected]
Phone: +1(424)231-4091
Deploy NexoPOS in 1 minute for free. No credit card required. Deploy Now
Deploy Now
If you already have purchased the product, you can download it from your account downloads.
WooCommerce Sync for NexoPOS is a module that ensures permanent connectivity with a WooCommerce store. This module is helpful to have a unified inventory online with NexoPOS 4.x, and ensure every time an order is created online, it's reflected on both sides (WooCommerce and NexoPOS) but that's not only what it does.
Every store owner has an eCommerce website and uses NexoPOS for their store. This module will ensure that the stock available on NexoPOS is the same as on WooCommerce so that only available stock is sold online.
Before using this module, it's important to meet the following requirements:
This module should not be used with NexoPOS installed locally. This way, WooCommerce won't be able to send orders to NexoPOS. Additionally, both installations should run over a secured protocol (HTTPS).
Currently, this module uses WooCommerce API and Webhooks to notify NexoPOS of every change in your online store and to reflect all modifications from NexoPOS to your online store. You'll then be able to perform the following synchronization operations :
Before being able to sync the products to WooCommerce and NexoPOS, you need to configure the module. The first configuration will happen on WooCommerce, then we'll see the configuration possible on NexoPOS.
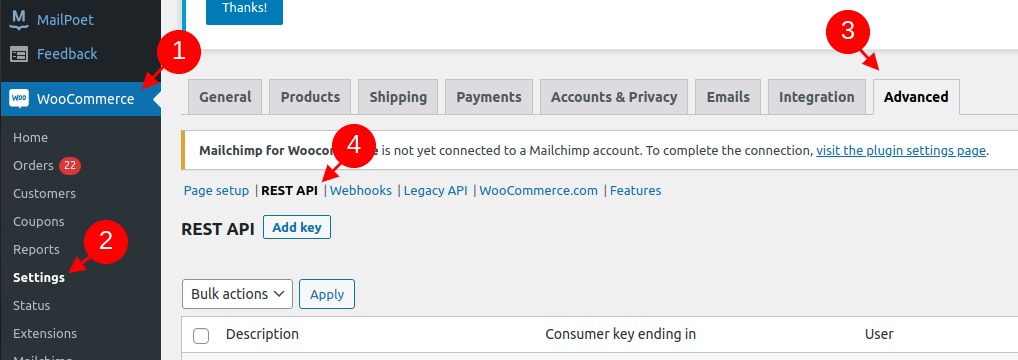
First of all, we'll head to WooCommerce settings and make sure to create Rest API Keys.
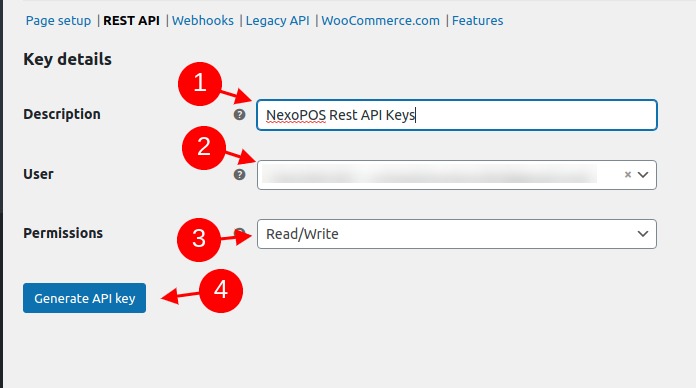
While adding a new key, we'll give :
Once you're done, click on "Generate API Key".
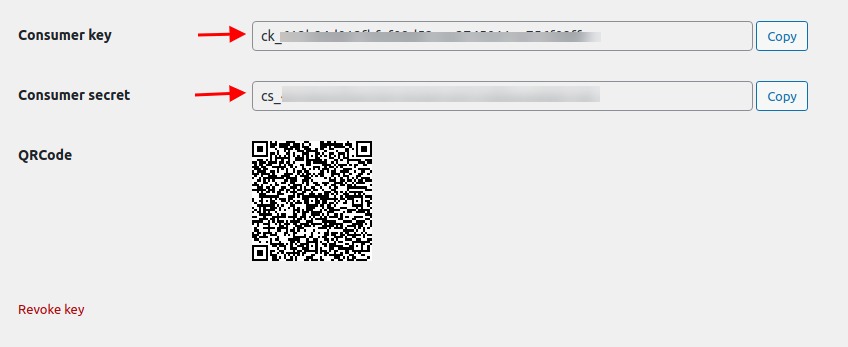
Once you're set, you'll see the consumer key and the secret key, which must be added to this module setting on NexoPOS 4.5.
Now, let's head to NexoPOS 4.x and open WooCommerce settings.
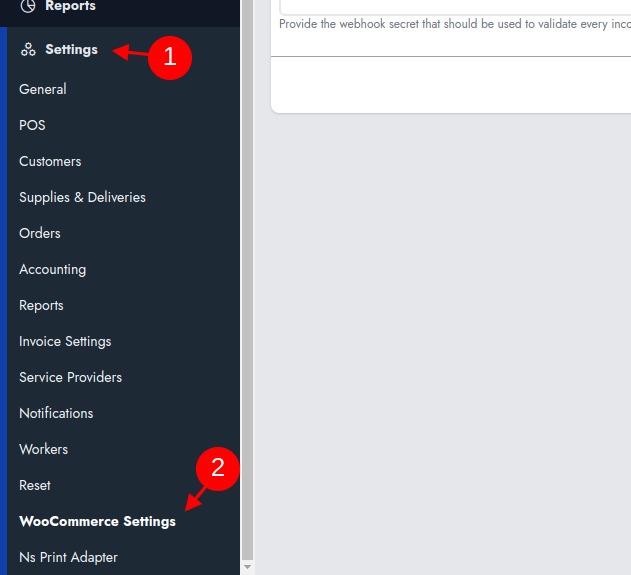
Then we'll need to fill in the following details :
And don't forget to save your changes. This will ensure NexoPOS can submit changes to WooCommerce.
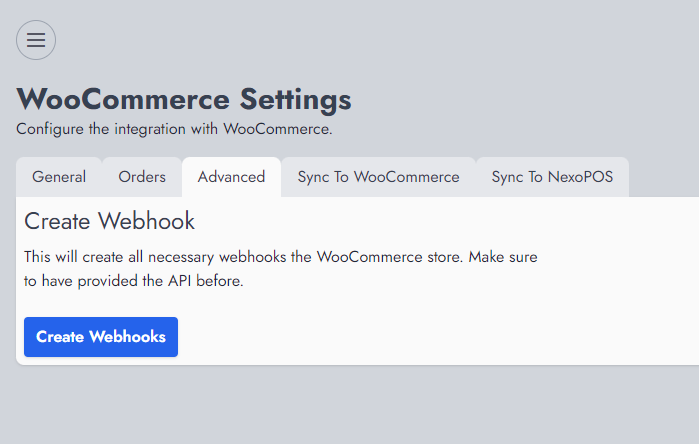
Now we want to make sure that every time something happens on WooCommerce, NexoPOS is notified somehow. In order to do that, we'll need to create webhooks. If you've registered the consumer key and consumer secret, you can head to the advanced tab on the WooCommerce Sync for NexoPOS, to create webhooks in one click.
If you rather like to proceed manually, let's head to WooCommerce > Settings > Advanced and now let's click on Webhooks.
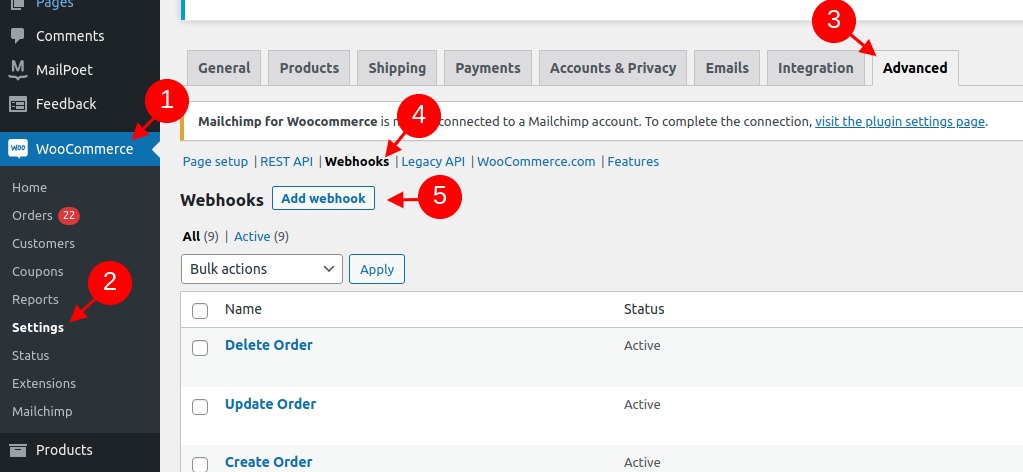
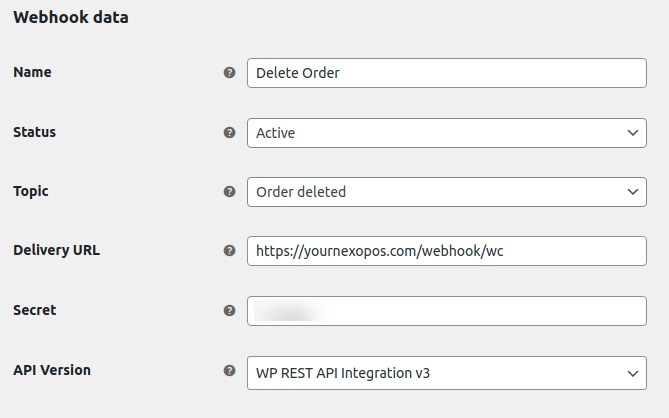
We'll make sure to register all the topics available and assign them to NexoPOS address. NexoPOS 4.x doesn't support topics for restored entry. Since NexoPOS doesn't have trash where orders, products can be temporarily moved, such topics aren't supported on NexoPOS. Additionally, NexoPOS doesn't support yet WooCommerce coupons. Here are the most recommended topics that should be used :
While creating these entries, all should point to https://yournexopos.com/webhook/wc. Make sure to replace yournexopos.com with your actual domain where NexoPOS 4.5 is installed. Here is an example of one topic being created
WooCommerce payments aren't the same as those used on NexoPOS. However, as NexoPOS supports multiple payments, it's therefore easier for you to create payments that match WooCommerce payments.
To recognize each payment, this extension needs you to assign the WooCommerce payment identifier to NexoPOS payments. So we'll start by heading to the available payments on WooCommerce.

You'll then click on the payment you want to see used on NexoPOS and edit it.
Once on the page of the payment, make sure to enable that and copy the identifier from the URL.
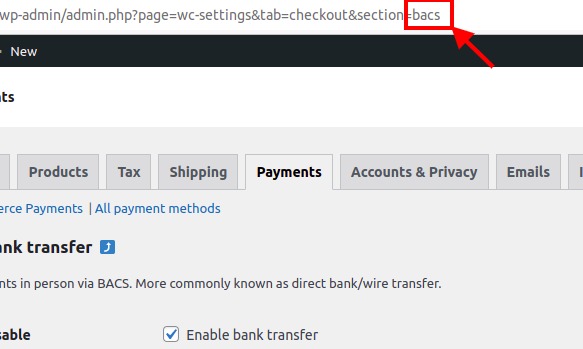
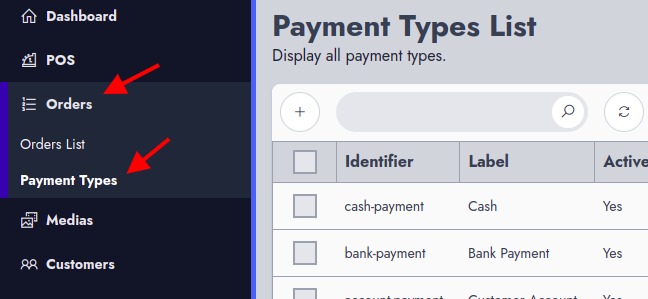
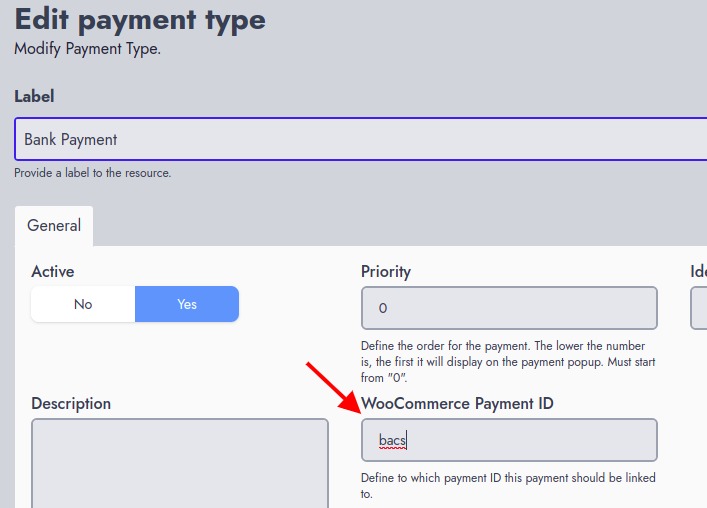
In the previous example, the identifier is "bacs". We'll then go to NexoPOS and search for the payment that should be considered as a bank transfer.
We'll then edit that payment (in our example it's "Bank Payment") and on the field "WooCommerce Payment ID" and paste the identifier we've copied earlier.
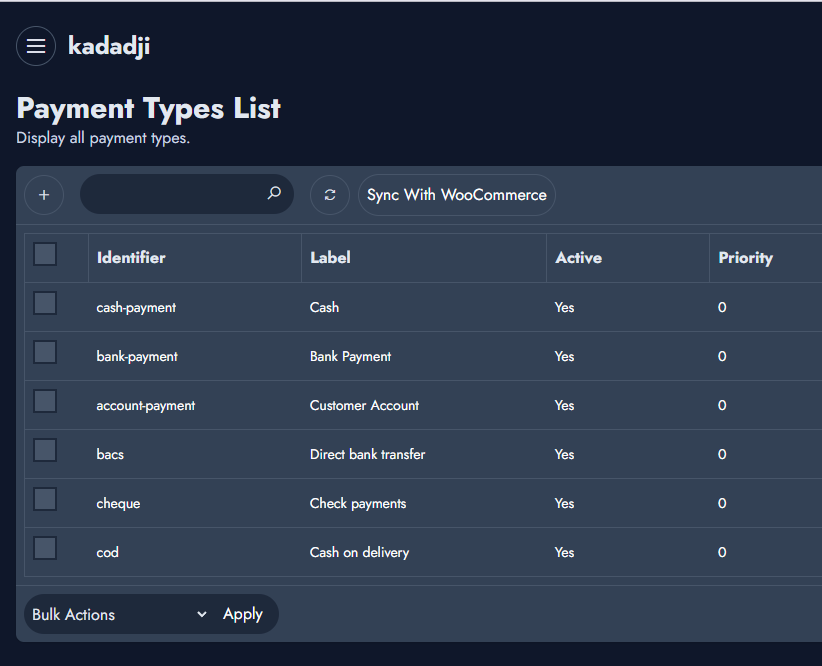
You'll repeat the process for all payments you want NexoPOS to recognize. Note that if an order with an unrecognized payment is submitted, that order will be ignored.
Additionally, you can load WooCommerce payments to NexoPOS. When you head to the payments on NexoPOS, you'll see a Sync button. This will load available payment methods on WooCommerce.
We'll cover other settings that need to be made before using this module.
You must set what is the shipping method that should be used for every order that is synchronized from NexoPOS to WooCommerce. For that, you need to open the "Orders" settings within WooCommerce settings.
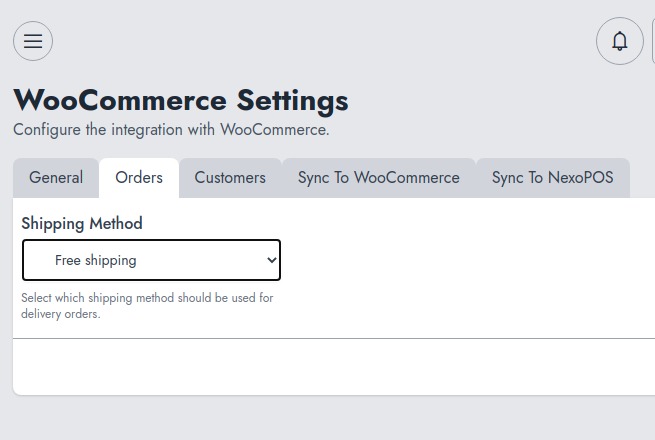
Don't forget to save your settings.
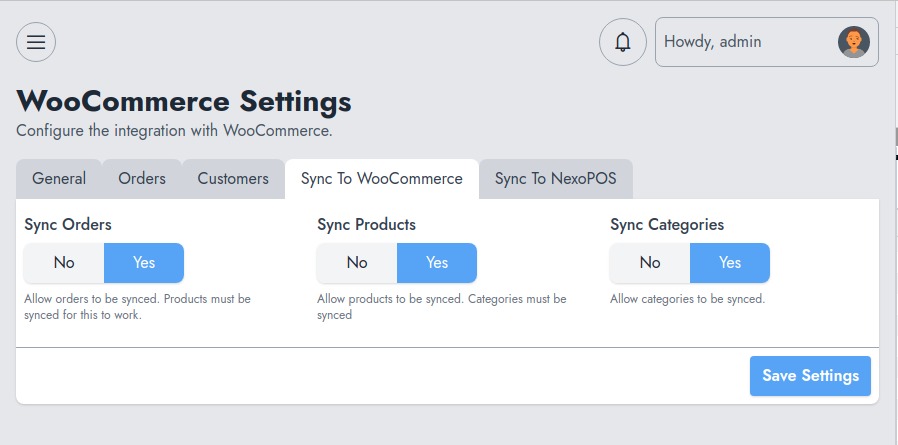
If you would like to restrict a few things that should be synchronized to your online store, you'll head to "Sync To WooCommece" settings and select the feature you would like to enable/disable.
Not all data submitted to NexoPOS will have an existing reference. Sometimes, you'll be invited to define what is the default information that will be used if, for a request submitted to NexoPOS, there is no existing reference.
For example, if a product is submitted to NexoPOS while a category assigned to that product doesn't exist yet on NexoPOS, you must define a default category so that every product with a nonexisting category is assigned to that default category.
To configure the defaults for NexoPOS, let's head to "Sync to NexoPOS" tab.
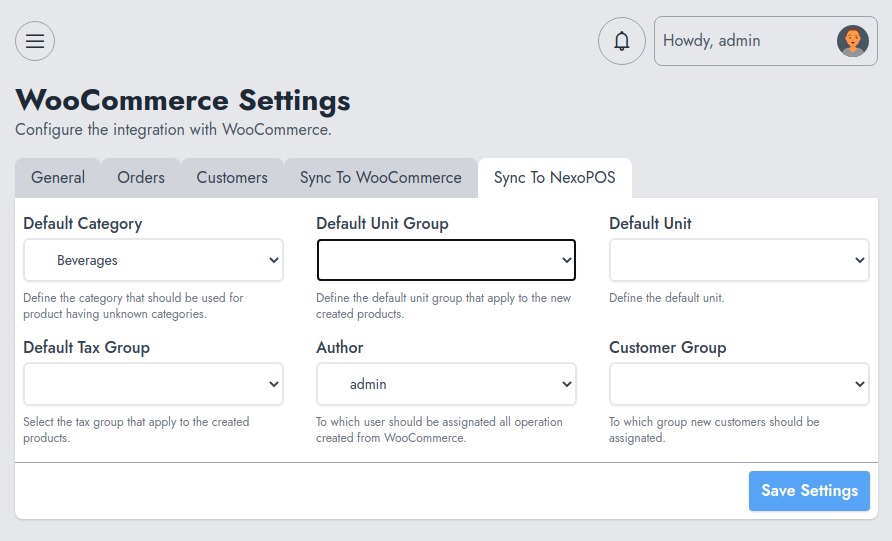
You should define :
from there you'll have to save so that the "default unit" dropdown is populated with the units that belong to the unit group selected. You'll also select :
Once you're done, save your settings.
If you plan to use NexoPOS as the actual inventory management. It might be necessary to consider a single source of truth regarding the stock. WooCommerce is not as detailed as it should be when i comes to letting you know how the stock is flowing back and forth. Therefore, relying on NexoPOS appears to be the best solution.
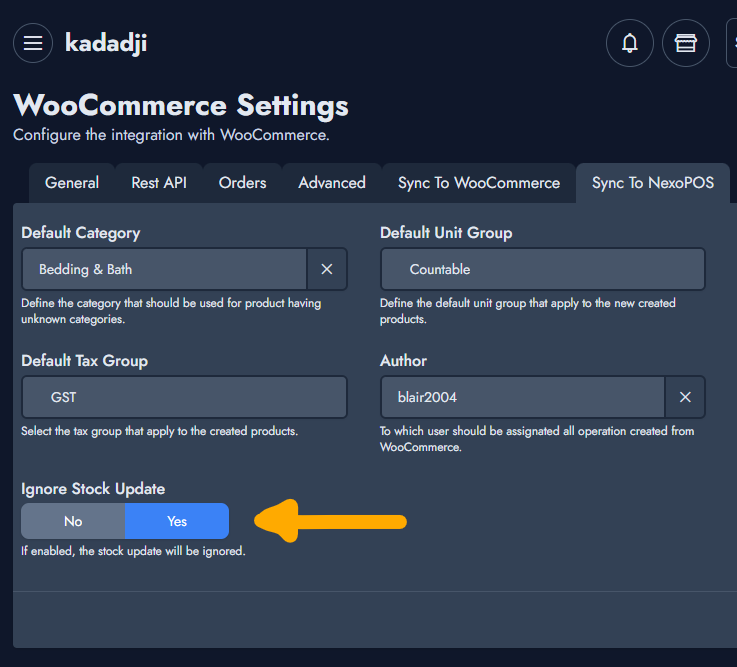
On the Sync to NexoPOS available on WooCommerce settings you should ensure to ignore all stock updates. This is useful because when an order is placed and paid, WooCommerce sends both a webhook for the order placed and the product updated. This will cause a double inventory deduction.
Additionally to what has been said before, here are the requirements to ensure everything works smoothly. Before performing any operation, you need to ensure these settings are configured:
Here are some tips you need to consider while using this module.
If you would like to synchronize all your existing products to NexoPOS, you'll need to bulk edit those products and just update them (not necessary to change any value). WooCommece will trigger a webhook for every product and those will be created on NexoPOS 4.5.
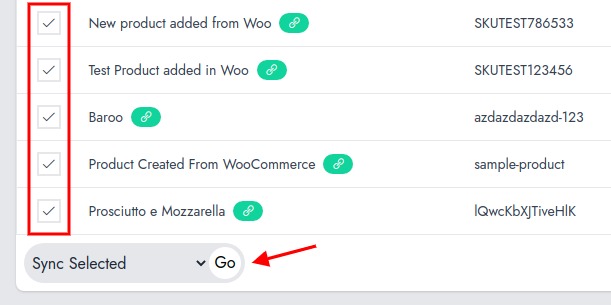
This only works for products, categories, and customers. If you would like to bulk synchronize your entries, on each component table, you'll select all the entries you would like to synchronize and select the action "Sync Selected".
Some issues might occur while using this module. The following points describe what might happen and how to prevent that.
Variations as provided on WooCommerce, are not supported on NexoPOS, as it doesn't yet have an equivalent feature.
This module has been tested and developed with WooCommerce 5.6.0. According to the extra WordPress plugins you might have, some errors might occur especially if those plugins change the way WooCommerce works normally.
While creating a product on WooCommerce, NexoPOS will attempt to find if a category attached to that product is already synchronized. If it's not, NexoPOS will get all the existing categories and synchronize them. However, this is limited to 99 categories and sub-categories. Beyond that, those categories will be ignored causing some products not to synchronize.
This module is not yet compatible with the multistore module. Once the support is defined, this guide will be updated accordingly. Additionally, this module doesn't support modifiers of Gastro.
An order might not be placed for various reasons on WooCommerce. Note that NexoPOS and WooCommerce have different required parameters. If NexoPOS billing information isn't required, it's the case for WooCommerce, you'll then make sure to define the billing information while creating the order.
If you created a product from the POS, that product won't be synchronized (included) on the sale sent to WooCommerce. This is because the product doesn't have any reference on WooCommerce.
If you see orders that have no products on WooCommerce, that is probably related to the product not being synchronized on WooCommerce. Every product should primarily have been created on WooCommerce and synchronized to NexoPOS.
If you're experiencing this error it's likely because the customer provided on NexoPOS is an administrator on WooCommerce. Unfortunately, the WooCommerce Rest API only returns customers so we can't pull the administrator ID to attach the order to him using the Rest API.
The Stock Transfers module ensures to be able to transfers...
If you already have purchased the product, you can download it from your account downloads.