Mail: [email protected]
Phone: +1(424)231-4091
Documentation
Everything you need to know about NexoPOS.
- Getting Started
- 0. Requirements
- 1. The Environment
- 2. Download And Build
- 3. Installation Wizard
- Components
- Accounting: Incomes & Expenses
- Cash Registers
- Customers
- Customers Group
- Expense History
- Expenses
- Expenses Categories
- Media
- Modules
- Numpad
- Order Types
- Orders
- Payment Types
- Procurements
- Product Categories
- Products
- Providers
- Reward System
- Stock Adjustment
- Table
- Taxes
- Taxes Groups
- Unit Groups
- Units Of Measure
- Base API
- Dashboard Widgets
- Hook System
- Role & Permissions
- NsMultiStore Api
- Make Jobs MultiStore Compatible
- Register Web & API Routes For MultiStore
- Updating Migrations
- Filters
- {namespace}-bulk
- {namespace}-catch-action
- {namespace}-crud-actions
- ns-crud-resource
- ns-dashboard-menus
- ns-dashboard-widgets
- ns-footer-signature
- ns-page-title
- ns-products-crud-form
- ns-products-history-operation
- ns-products-type
- ns-table-name
- ns-views:pages.sign-in
- ns-views:pages.sign-up
- ns-web-receipt-template
- ns.forms
- How To's
- Changing Domain
- Checkout Popup
- Database Configuration
- Email Configuration
- Enable Low Stock Notification
- Installing And Updating A Module
- Installing NexoPOS 4.x On Laragon
- Installing NexoPOS 4.x On Plesk
- Installing NexoPOS 4.x Using The cPanel
- Installing NexoPOS On Hostinger
- Link Nexo Print Server To NexoPOS 4.x
- Local Network Configuration
- Manage Customers On The POS
- Manage Sales Refunds
- Manual Module Installation
- Orders With Instalments
- Rebranding NexoPOS 4.x
- Translating NexoPOS
- Updating NexoPOS 4.x
- Using The Sales Filter
- Javascript API
- nsHttpClient
- nsNotice
- nsSnackBar
- Actions
- ns-crud-footer
- ns-dashboard-footer
- ns-dashboard-pos-footer
- ns-dashboard-settings-footer
- My NexoPOS
- Assign Print Jobs
- Cloud Print Setups
- Creating My NexoPOS Clients
- Deactivating Nexo Print Server 2.6 License
- Linking My NexoPOS To Envato
- Nexo Print Server 2.6.x License Validation
- NexoPOS 3.x License Validation
- Developpers Guides
- Add Create Button On <search-select/>
- Add Crud Entry Custom Action
- Add Crud Header Buttons
- Cart Custom Buttons
- Creating A Sample Hello World Page
- Creating Crud Components
- Creating Custom Pages
- Creating Custom Print Handler
- Creating Settings Page
- Dashboard Theming
- Database Migration
- Generating Modules
- Handle Crud Actions Using JavaScript
- Injecting Vue Component
- Model's Dependency
- Module's config.xml File
- Module's Routing
- Register Dashboard Menus
- Render Field As Vue Component
- Reset User Password With Tinker
- Service Provider
- Troubleshooting
- Broken Media Images
- Common Database Issues
- Conflicting Dashboard
- CSRF Token Mismatch On NexoPOS 4.x
- Disabling Modules Manually
- Environment Misconfiguration
- Gastro Empty Receipts
- Images Not Loading
- No Dashboard
- No Default Customer
- Products Not Appearing For Sale
- Products Not Showing On The POS
- Queues Jobs Are Disabled
- Using Nexo Print Server With SSL
- Gastro Guides
- Managing Modifiers
- Crud API
- Add Crud Entry Custom Action
- Creating Crud Components
- Declare Custom Crud Export Columns
- Handle Crud Actions Using JavaScript
- Header Buttons
- Method: beforeRenderForm
- Method: getView
- Nexo Print Server
- Configuration
- Javascript Actions
- ns-before-mount
- ns-pos-pending-orders-refreshed
- ns-settings-change-tab
- ns-settings-loaded
- Events
- CrudHookEvent
- SettingsSavedEvent
Database Migration
If you plan to extend NexoPOS with modules, then you might consider interacting with the database. But unless you plan to use the existing database, you'll need to create your tables or maybe add new columns to existing tables. This guide will describe how you can create migrations for your module.
# What is a migration
A migration stands for a file that executes during an upgrade process that aims to mutate the database schema. But it's not limited to that, as it can be used to :
- Create new permissions & roles
- Perform a bulk modification on current entries
- Etc.
Note that once a migration has been executed, it cannot be executed again unless NexoPOS loses track of that migration. This can be made using the migration forget command.
# Migrations Best Practices
Migrations are stored within the folder "Migrations" of your module. Unlike Laravel migrations, PSR-4 applies to these files, and then, the class name much matches the file name. You're not forced to create migration manually as you can use the command that will be shared below.
The best technique is to provide a unique name for each of your migrations even if the task is performed on the same table.
Usually, migrations that update existing tables should start with "Update", ie: "UpdateBookingTableMarch10" or "UpdateBookingTablePriceColumn", either way, you need to make sure the name is unique as you might need to create another migration for that table in the future.
In case you want to create new tables on your migration file, your file name might start with "Create", for example, "CreateBookingTable".
A migration file that creates a table should not update a table. Create separate migrations for both to avoid any confusion.
# Creating A Migration With A Command
NexoPOS comes with a command that helps you to create a migration for your module. Here is the signature of that command :
php artisan modules:migration {moduleNamespace}Where {moduleNamespace} must be replaced by your actual module identifier. Right after having submitted this command, you'll be asked to provide the name of your migration.
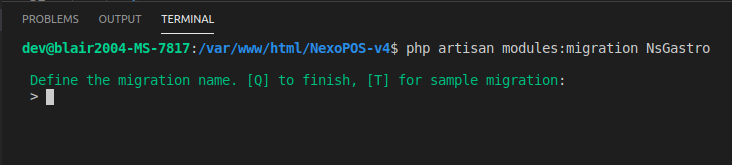
The prompt will remain open for subsequent migrations, use Q to quit.
On your Migrations directory, you'll be able to see your migration file.
# How To Create A Table
As NexoPOS is based on Laravel, you'll need to follow the instructions shared on the Laravel documentation regarding migrations. However, as the migration file might be executed more than once, we'll invite you to perform verification and check if :
- The table you would like to create exists
- The column you would like to add/remove exists
These are described in the same documentation here.
# Mass Update For Existing Records
If you have some entries on your system, after having performed a migration that changes a structure, you can pull these entries using their model to perform a bulk update. For too large entries to update, you might consider dispatching an asynchronous job.
# Creating Role And Permissions
The migrations are the perfect place to create Roles and Permissions for your module. You can follow the instructions that are shared on creating a Role and Permission.
# What Are The "up" and "down" methods
These methods are used by NexoPOS to do (up) and undo (down) a modification on the database. This means if you would like NexoPOS to perform a modification on the database, you'll write your code on the "up" method. When your module is uninstalled, NexoPOS will execute the "down" method for all of your migrations.
Usually, we don't undo columns added on tables that are created by the module. But to undo changes added on external tables, you'll need once again to check if that column exists.
# Migration Dependencies
You might sometimes want a migration to execute if another module on your system is installed and enabled. This will ensure, in case you want to change the schema of that module, that the module tables beforehand are created.
You'll just need to provide a DEPENDENCIES constant to your module, which is an array with modules "namespace".
In this example, the "up()" method will only execute if the module "NsGastro" (which is the Gastro module namespace) is installed and enabled. Note that the migration might depend on multiple modules at the time.
This means the module "YourModule" can behave normally and will automatically update the schema anytime Gastro gets installed and enabled. This will ensure the module works with and without the dependencies.
# How To Execute Migrations
You don't need to execute a migration, NexoPOS will perform the migration automatically. Every time a migration is performed for the module, a record is saved on the "modules_migrations" table. Deleting that record will force NexoPOS to execute that migration again. In order to keep NexoPOS fast, all migrations executed are cached to avoid unnecessary calls to the database. You'll then need to clear the chase using the following command :
php artisan cache:clear