On NexoPOS 4x, we’ve combined two feature together that works pretty much the same way, but looks confusing for some users. We’ll talk here about the customers credit and the credit sales (unpaid orders).
What is the Customer Credit
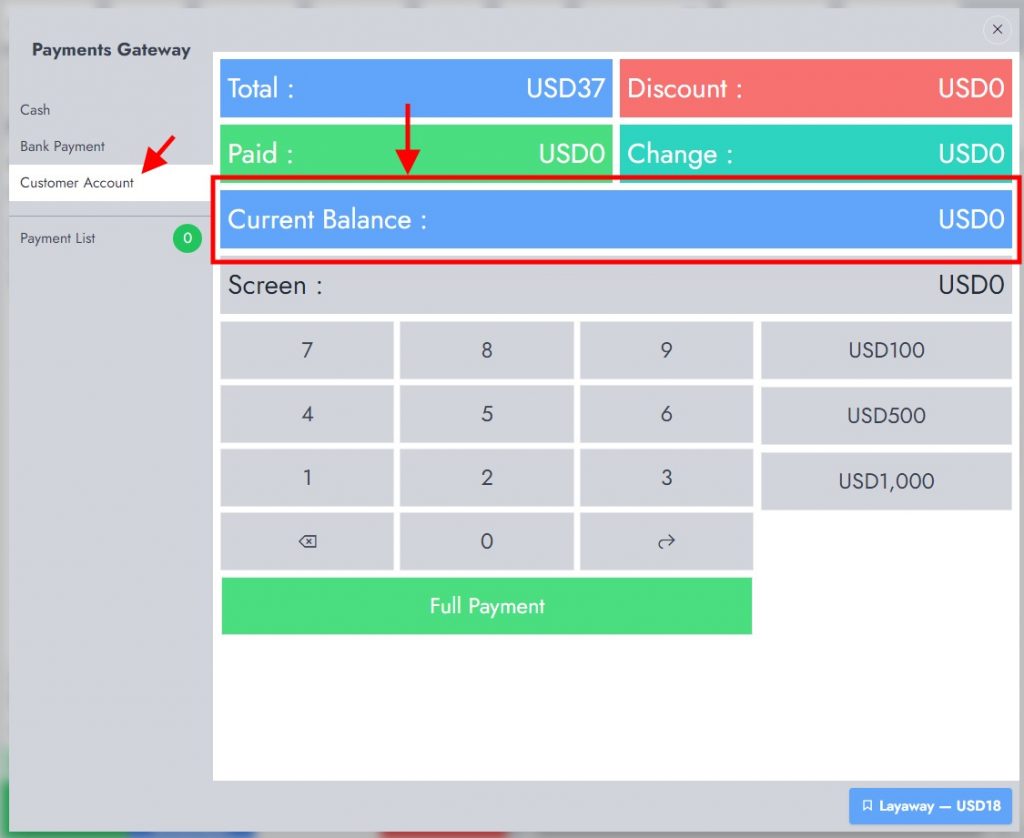
The customer credit is a virtual wallet available on the system where the customer can make deposit for purchasing goods. Here the cashier will then ask the cashier or whoever is in charge to exchange credit with a cash amount he has. That credit can be used while making a purchase.
Managing Customer Credit
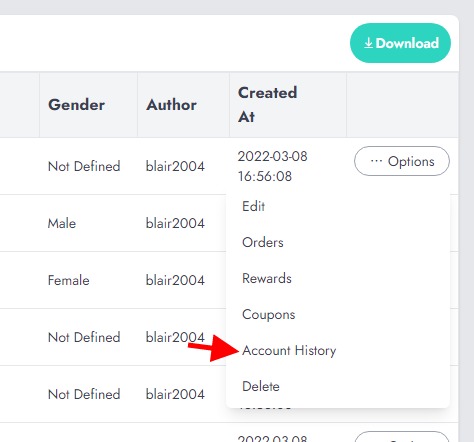
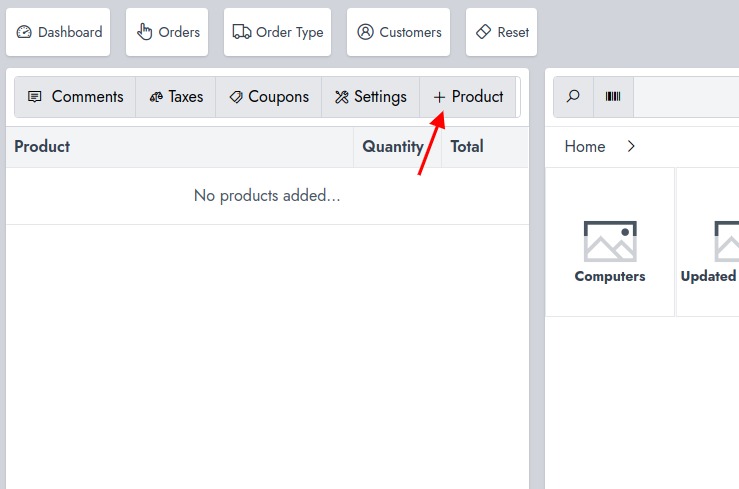
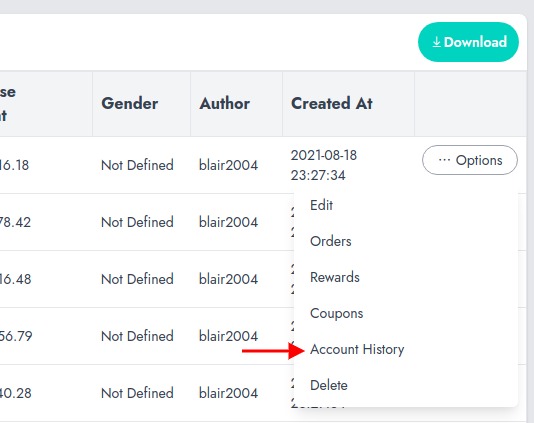
By managing, we mean being able to add or remove funds to a customer credit. First of all, you’ll need to search for the customer on the customers list. Then click on “Account History“.
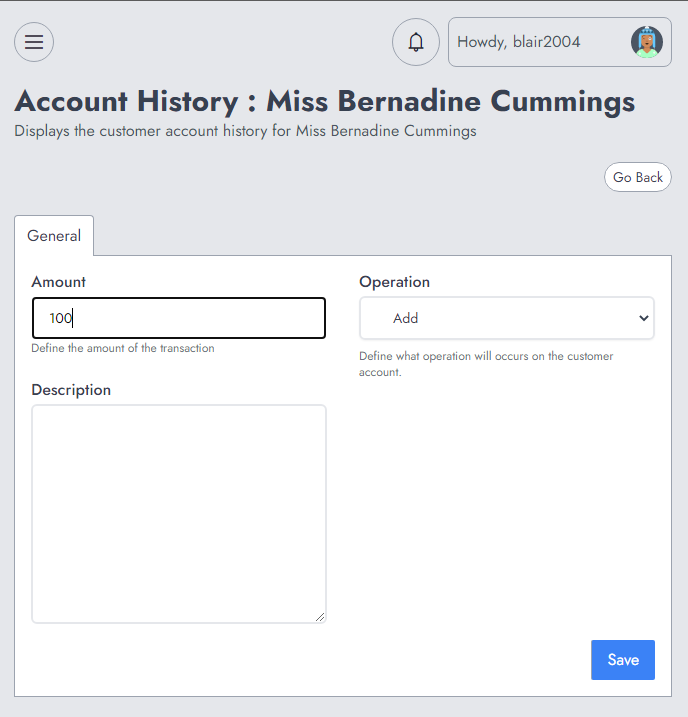
From there, you’ll see all the transaction made on the customer account. You can also perform manual operation:
Deduct funds
Add funds
Everytime you record a manual transaction, the customer wallet balance will be updated.
Credit Sales : Order On Installments
NexoPOS allows you to save unpaid or partially paid that will be completed later by the customer. On the system it’s named “Layaway“. It’s an order that will be paid on installments.
We’ve covered how to create credit sales on NexoPOS. In few words, you’ll be able to define what is the minimum amount that needs to be paid for each customer and what is the payment date for each slice.
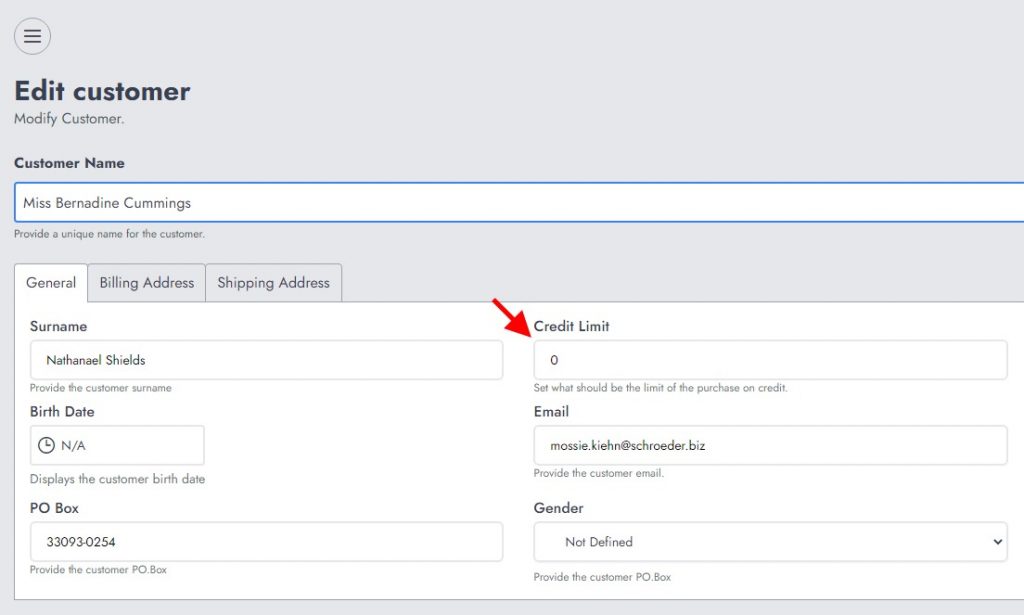
If you would like to set a maximum amount for due orders allowed for your customers, you might need to edit the customer and ajust his treshold.
Note that if it’s set to 0, that means there is no limitation for credits.
Today we’ve released NexoPOS 4.5. We would like through this post, to share all the new features so that you know how to take benefit from them.
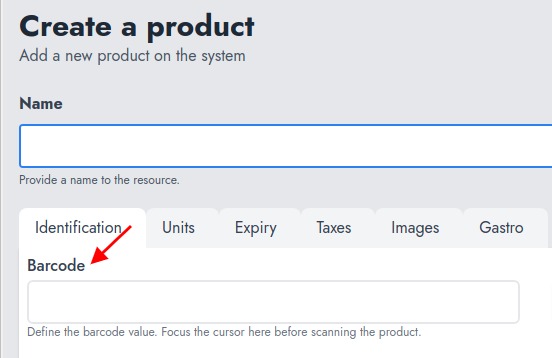
Default Barcode Generated
On the previous release of NexoPOS 4.x, when the barcode wasn’t provided, it wasn’t possible to create the product. Now, the barcode field is no more required and NexoPOS will create a barcode if it’s not provided.
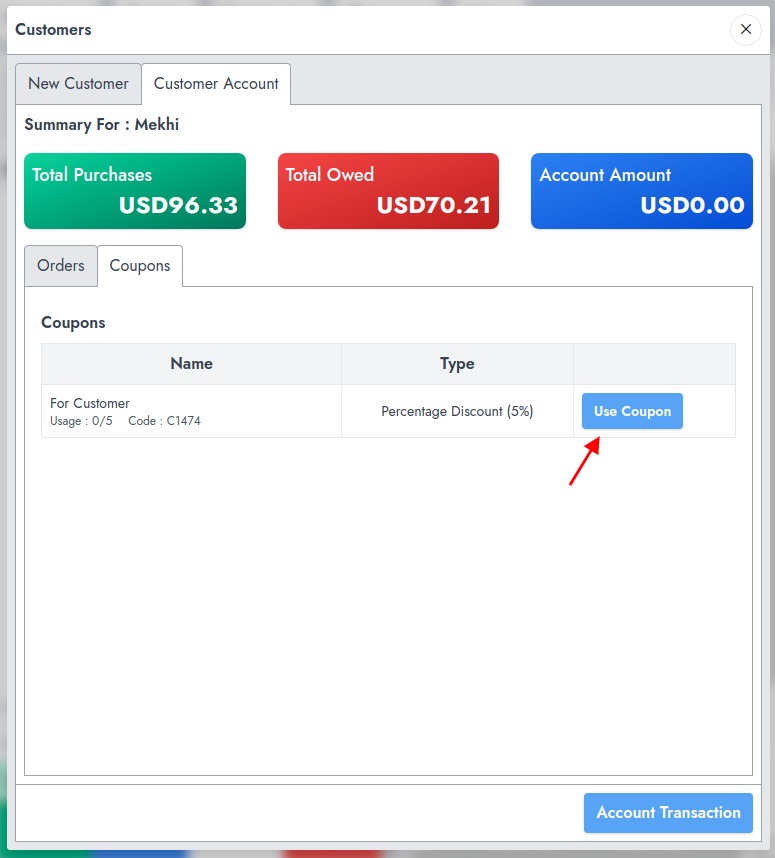
Explore Customer’s Coupons From The POS
We’ve added a way to check the coupons that are assigned to a customer. From that new section, you can directly choose to apply a coupon to the ongoing order.
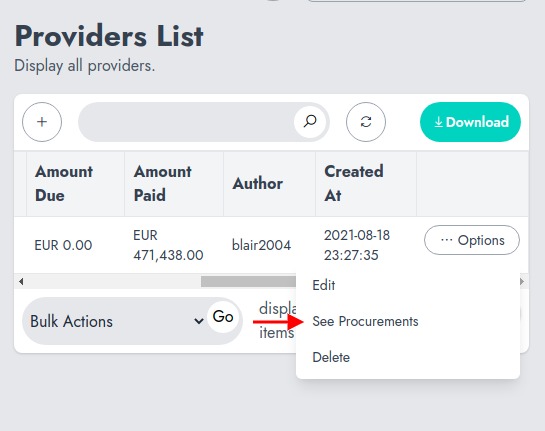
Checking Providers Procurements
You can now check all the procurements that have been made by a specific provider. This is an option that has been added to the providers’ list. After clicking on “Options”, you need to click on “See procurements”.
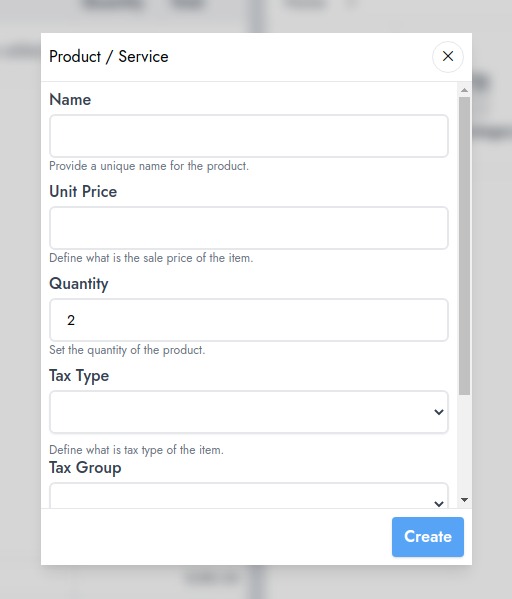
Added Support For Quick Products
Quick Products usually refer to a product that we don’t want to be persistent be would like to apply to the order. Usually, stores use it to charge service, tips, or related items.
While adding a quick product, you can assign a tax, a unit, define a quantity, and the sale price.
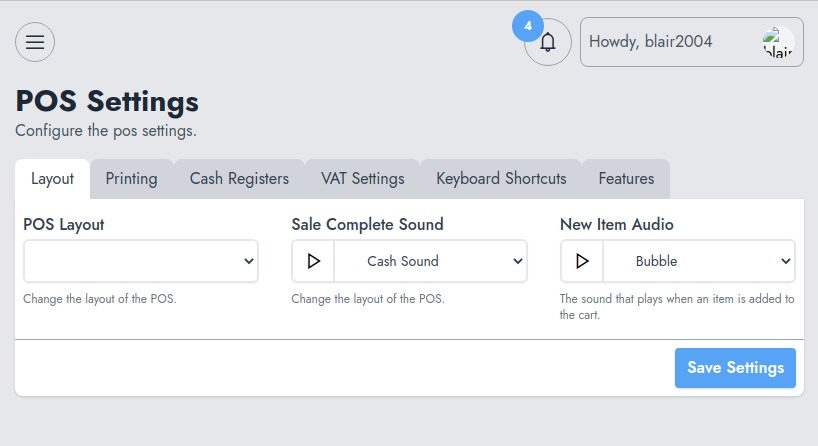
Sound Notifications
We’ve added a new option for using sound notifications on the POS. this means on specific events, the POS will produce a notification. We have the choice between some sound effects from the POS settings.
Prevent Undesired Closure From The POS
Now when the cart is not empty, you’ll need to confirm your action when you try to close the POS. This will prevent undesired closure, which caused the loss of the ongoing unsaved order.
Customer Account History
The customer account works as a wallet for the customer. For that we’ve created a history that tracks every operation that involves that wallet :
Sale
Refund
Cash In (crediting the customer account)
Cash Out (deducting funds from the customer accunt)
Warning Regarding The Marketplace Modules
Note that this update includes breaking changes that might cause previous modules not to be compatible with this update. Before installing this update, make sure the modules you’re using are also set for version 4.5.x.
You might be wondering like many of our customers what are the main differences between NexoPOS 3.x and 4.x. If They carry the same name, they should not be that different right? Well, if that’s the question you ask yourself, you’re at the right spot. This tutorial will go through the main differences between NexoPOS 3.x and 4.x and hopefully that will give you reason to migrate.
Let’s get started.
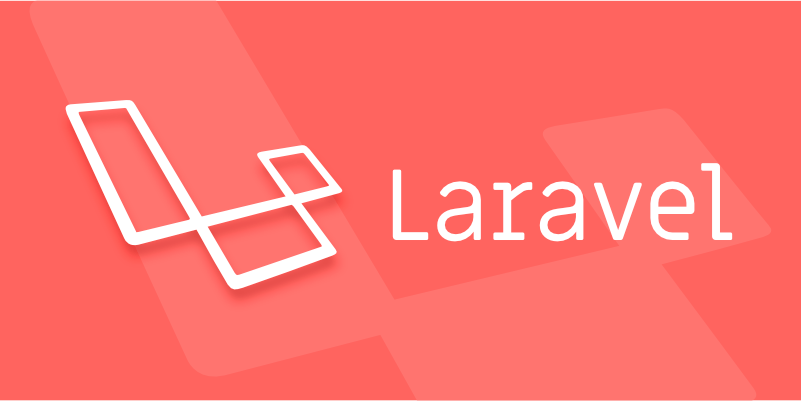
Complete Rebuild With Laravel
NexoPOS 4.x comes with a new structure. After several months of research, we chose to deploy NexoPOS 4.x on Laravel first. In comparison with the previous tool used on NexoPOS 3.x, Laravel offers way more tools that helps :
Run Asynchronous Operation
Debug The application
Handle Better Dependencies
Flexibility for Scaling NexoPOS 4.x
NexoPOS 3.x is based on a custom version of CodeIgniter which tries to bring the Hook from WordPress and the routing from Laravel. That mixture of features was the main advantage of NexoPOS 3.x but also the major concern as script integrated (created by third-parties developers) was dropped and no more supported.
Fast, NexoPOS 4.x Is Really Fast
The main issue we had with NexoPOS 3.x is the lack of asynchronous operations, which make the application to be very slow because all heavy operations were handled by the same process that executes NexoPOS 3.x. That caused the app to be slow time on time.
During the configuration of the environment for NexoPOS 4.x, you’re invited to configure Queues, and that’s exactly the place you can define how many PHP processes can handle NexoPOS 4.x background tasks.
Concretely, let’s say you want to delete an expense that has been made last week. On NexoPOS 3.x while reading the report, the system will compute every expense made during the time range you’ve defined. When you consider checking the same report multiple times during a day and about a hundred times a week, that makes a lot for the server.
On NexoPOS 4.x every operation is computed before being stored on the database. This mean, if you delete the expense from the last week, NexoPOS 4.x will run a background task that will compute taxes from that day till the current day, gradually every 5 minutes, this way even if the changes aren’t replicated immediately, it’s just a matter of minutes before having all the reports consolidated. That the same process that is used for creating recurring expenses.
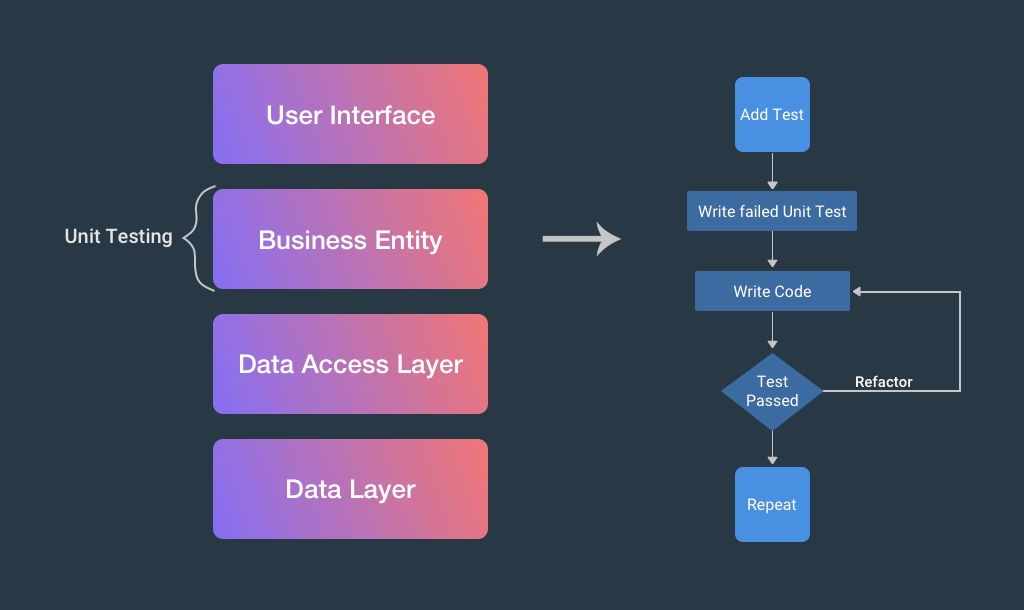
You’ll Enjoy The Stability
Because NexoPOS 3.x was running on a quite old framework lacking tools to ensure a better development, we were forced literally after every update to manually test the entire application.
Think about it, we were forced to create products, categories, customers, stores, sales, expenses, etc. That was a very hard task to perform after every single update.
NexoPOS 4.x uses Unit Testing. If that’s unfamiliar for you, you should know that it’s just a tool to perform tests for us, based on certain conditions and scenarios we wrote. This way, after an update, we just need to run that tests and we’ll immediately spot if our change has affected one or more other sections of NexoPOS 4.x.
MarketPlace For Extensions And Apps
The marketplace we’ve launched is mean to host all extensions and app we’ll create and release for NexoPOS 4.x. As we want NexoPOS 4.x to be as extensible as possible, you’ll usually find there modules or apps that add/modify specific behaviors or even enrich the experience on NexoPOS 4.x.
This because we don’t want to overload the application with all possible implementations. Access to the marketplace is free (you need an account which is also free). Some modules are free and others will require a subscription. We’re also sharing modules of NexoPOS 3.x we’ve created so far and that we’ve not necessarily published on CodeCanyon. These modules are all free.
Permanent And Dedicated Support
We know some users might be a developer and would like to customize NexoPOS 4.x themself. If you’re in that case, we should let you know that from the smallest package, you get dedicated support from us even on a customized version of NexoPOS 4.x. I would like to clarify exactly what I mean to avoid any confusion.
The support we’ll provide is not customizing NexoPOS 4.x for you which is part of another service we provide. The support therefore includes :
Installing/Updating NexoPOS 4.x on your server (at your demand).
Fixing issues spotted on the original version.
Fixing issues on all our modules (doesn’t apply to NexoPOS 3.x modules, which are subject to Envato Terms).
Explaining technical features and giving hints on what you can possibly do for a specific change.
If we have reason to believe the changes you have done has led to an issue, we’ll also let you know that.
In order to receive support from our team, you need to subscribe to one of our packages. The support is provided as long as the user is subscribed to one of the mentioned packages.
We Keep The Best Of NexoPOS 3.x
We’re bringing back everything you’ve liked on NexoPOS 3.x to NexoPOS 4.x that includes :
We noted what we’ve disliked and have improved them, especially :
Creating Custom Roles.
Better Permission Manager System.
Better Security System.
Improved Performances.
And the list goes further longer as there are many other features we’re about to implement very soon.
Rest API and Documentation
One of the biggest mistakes we did with NexoPOS 3.x was the lack of technical documentation for developers. Not everyone was able to extend the system. NexoPOS 4.x comes with a readme folder that explains various internal concepts of the system. We’ll also here on our website share tutorials and tips on how to use the internal API.
As NexoPOS 4.x is using Sanctum, It herefore has a Rest API, which can either be used by other web apps and even mobile applications.
Accurate And Fast Reports
As we’ve mentioned earlier, NexoPOS 4.x compute behind the scenes. That makes that while checking a report, no calculation is made and the report is therefore delivered very quickly.
With the use of Laravel relationships, we’ve been able to link Order to Order Product to Product to Unit Product to Taxes. That way, we’re able to track every entity that is created.
Summarizing
That’s definitely not all the difference that exists, but this can at least be considered as the main differences between NexoPOS 3.x and NexoPOS 4.x. So do you think it worth migrating to NexoPOS 4.x?
The major addition of NexoPOS 4.x is providing support for units of measure. A unit of measure is a feature through which NexoPOS 4.x is able to handle stock using various measures. This tutorial will then explore what is the working principle of the units, units group and how to create and use them.
Unit Of Measure : Working Principle
The idea behind the unit of measure is that not all products could be counted and sold the same way. As most products could be sold as a piece, many other needs a different handlement. For example, meat can be sold using the kilogram measure, gasoline as liters, eggs as dozen. According to the way you plan to sell your item, you’ll create a unit and a unit group.
What are Unit Groups?
NexoPOS 4.x introduces the concept of units group which ensures to have units of the same nature grouped together. For example a within the unit group “Liquids” we can create “Liters”, “Milliliters” measures. Within the unit group “Weightable” we can create “Kilogram” and “Gram” measures.
About Units and Base Units
Every unit group has a base unit. This unit is a pivot as it’s based on that accurate calculation is made for conversion. Usually, the base unit is the smallest unit of the group. In the case of the “Liquids” unit group, the smallest unit we might want to use is “Milliliters” which should therefore be set as the base unit.
The subsequent units defined on the same unit group must use the base unit value as a reference. For example, if we set the “Milliliters” value to be “1”, then the “Liter” value will be 1000 times a milliliter so “1000”.
Another example will be, if the “Egg Piece” value is set to “1”, then “Egg Thirties” will be 30 times “Egg Piece” so “30”.
Let’s now figure out how to define a unit group and attach unit to it.
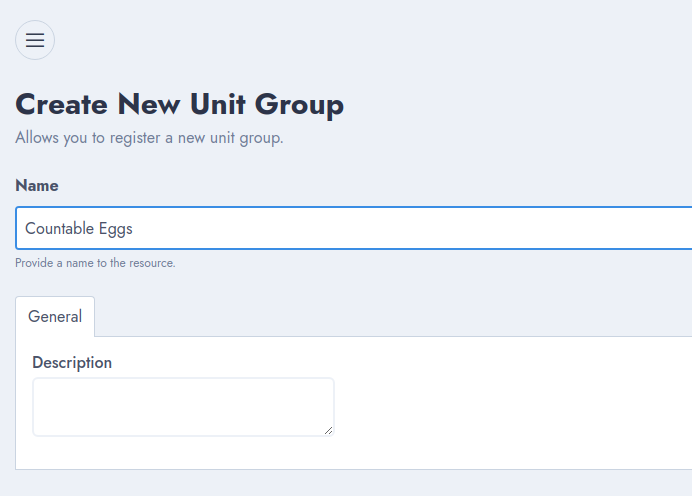
How to Create a Unit Group
First of all we’ll create a group. For this example we’ll assume we’re selling eggs, so we’ll create “Countable Eggs”. It might be just “Countable” things that we can count in pieces, but as we want to give a special values to the units, we’ll use that specific name.
Create Unit Group UI
In order to create a Unit Group, you need to head to “Inventory > Create Unit Group”. This shows a common CRUD UI where you have to provide a title at least and a description if you want. Then you can save the form. You’ll be redirected to the list of the unit groups created so far.
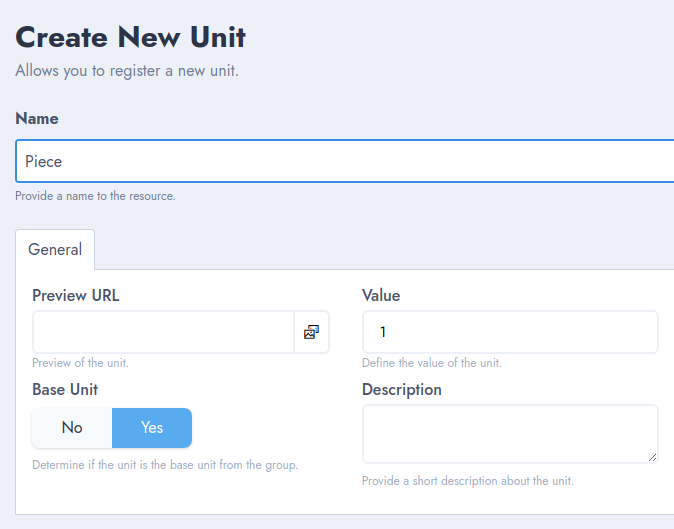
How To Create A Unit
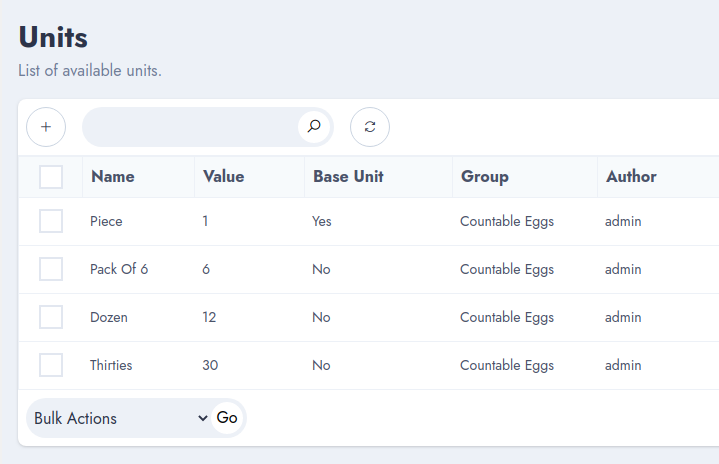
Now that we have a Unit Group ready, let’s create some Units. As we’re working on “Countable Eggs”, we need to identify what are the possible way eggs could be sold on the system. Usually, eggs can be sold as :
Piece (1): base unit
Pack of Six (6)
Dozen (12)
Thirties (30)
The value that is available on the brace is the value of the unit. In order to create a unit, always under the inventory menu, let’s choose “Create Unit”. That takes you to a common CRUD interface, where you can define :
The name
The preview URL
The value
The group to which the unit must be assigned
Whether it’s a base unit or not
Description
Once you’re set, you need to click on “Save” and proceed as mentioned above to create subsequent units.
Created Units
That’s all to create units group and units on NexoPOS 4.x. You might wonder now how to assign these to a product. That’s covered in another tutorial.
After many months of planning, My NexoPOS is now available for the public. This service mainly aims to be the first location to look for information on NexoPOS 4.x and related modules/services. Throughout this tutorial, we’ll let you know what is My NexoPOS, how it will evolve over time, and talk about the NexoPOS 4.x beta 1 release date.
The Main Purpose Of My NexoPOS
My NexoPOS is first the blog where we share resources regarding NexoPOS 4.x. By resources, we consider User Guides, Developers tutorials, miscellaneous posts around NexoPOS 4.x. We have therefore mainly created this website to ensure providing the most useful resources for anyone interested in using NexoPOS 4.x. However, that can’t only be the only reason.
My NexoPOS Enhances NexoPOS 4.x Features
NexoPOS 4.x as you might already know is a free point of sale application. Based on the experience we’ve got with our previous customers, we wanted to offer the best possible free open source system, to ensure without spending any penny, anyone can try NexoPOS 4.x and use it right away. However, My NexoPOS plans to provide more features to NexoPOS 4.x by providing a set of services that, while being optional, are highly helpful.
Dedicated Support Team
One of the benefits of My NexoPOS is to provide a dedicated team that is available to help and guide on the installation and the configuration.
The support we provide goes beyond the original version of the application as in some cases, we can assist you even on a customized version of NexoPOS 4.x. Our team will also install and configure NexoPOS 4.x in your server to make sure it works correctly and completely.
MarketPlace Of Modules
The basic features of NexoPOS 4.x might not be enough for most businesses. That’s the reason why we’ve created a marketplace of modules. That will be a repository of all the modules we’ve created around NexoPOS 4.x. Here is the list of the modules that are currently on our roadmap :
Gastro 4.x,
Self Ordering Kiosk 4.x,
Legacy NPS 3.x,
NexoPOS 3.x Migration Module
Racks Manager
Multi-Store Module
Stock Transfer Module
eCampaign
SMS Modules & Campaign
Because we want NexoPOS 4.x to be extensible, we believe decoupling features into modules, ensures to have a fast default version that isn’t overloaded. The major benefit of the marketplace is that modules available there doesn’t require purchase. The only thing to have is a valid subscription plan. The price of the subscription won’t increase as the modules list grows.
Mobiles & Native Applications
NexoPOS 4.x aims to be more compatible with various devices. In order to be able to be compatible, we’ll create various mobiles & desktop applications. Here is the list of the applications that are currently in our roadmap :
Barcode Reader (mobile app)
Online Store (mobile app)
Order Delivery (mobile app)
Nexo Print Server 4.x with Cloud Printing (desktop app)
NexoPOS 4.x with Offline Services (desktop app)
Waiter App (mobile app)
We’ll elaborate in detail on what are each application and how it works. Those having access to the mobiles & native apps has an access to experimental research, so they can before everyone try our new projects on NexoPOS 4.x.
NexoPOS 4.x Beta One Release Date
While the development of NexoPOS 4.x is still ongoing, we’re pretty confident about the system and the features that will be available on beta 1. We’ve scheduled the release of the beta for December 15, 2020. This should give us (with your contribution) enough time to test most of the available features and ensuring it works as it’s expected.
We’ve yet released a list of features that should be available on NexoPOS 4.x. Some of these features won’t be available at the release of beta 1, but gradually after the tests that we’ll run until beta 2 (or production-ready version), we’ll start working on these features (modules).
My NexoPOS Premium Early Access
We have yet received a lot of encouragement and support from our customers. Being able to support the project was restricted to a few well-known customers. However, as the project is close to being released, we yet want to offer a deal to all our customers. My NexoPOS offers 3 subscription packages. Amount these subscriptions we’ve chosen to offer the Premium Package with 50% Off. This means the package that includes :
Dedicated Support & Updates
Includes 5 installations
Marketplace Access (+10 modules)
Originally billed $ 479.88 is now $239.88/1 year, until December 2020. As we’ve initially mentioned, our team will closely support each customer and yet we’ll guide them through the configuration of NexoPOS on their environment (as 80% of included features aren’t likely to change on production).
Summary On My NexoPOS
My NexoPOS is then a service we’ve created to help anyone interested on NexoPOS 4.x using it at his full capacity. As some features aren’t yet available, we’re confident they’ll be added and will work smothly. You should remember, NexoPOS 4.x is free and can be downloaded on Github. If you have some ideas you believe will be useful for NexoPOS 4.x, we’re open for any type of contribution. If you’re ready to take it to the next level, you can yet get a plan available early access.
NexoPOS is a Web Point Of Sale application running under Laravel 8. This free software can be installed anywhere there is a compatible environment. By environment, we mean PHP 7.3 & MySQL. This guide explains how to install NexoPOS 4.x on Ubuntu 20.04.
Prior Consideration Before Starting
NexoPOS 4.x still in development however, it can yet be installed and tested. It’s not ready to use for a production environment, but when that will change, this guide will be updated accordingly. This guide requires basic command line mastery and a user with root privilege to install the required tools.
Creating Decent Environment For NexoPOS 4.x
Here follows the tools needed to configure the environment for NexoPOS 4.x.
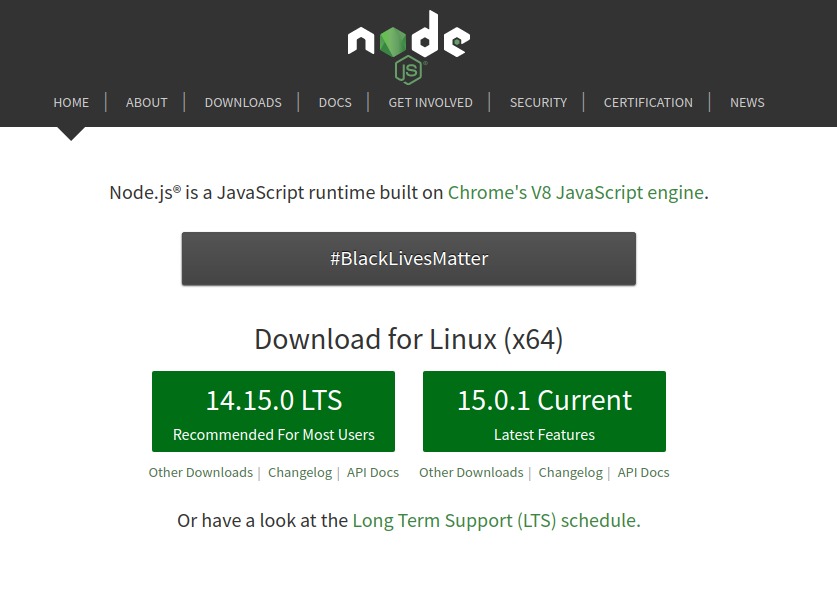
Installing Apache, PHP 7.4, and MySQL
As this requirement is a complete tutorial, the following guides can be used to install PHP and MySQL (along with PHPMyAdmin).
For using NexoPOS 4.x locally, it’s recommended to create a virtual host. Using PHP-FPM it’s possible to create a virtual domain where NexoPOS can be accessed. PHP modules such as Mbstring, XML are required as well. Usually, running a command like what follows should be enough :
Proceeding this way should also install PHP vendors. However as NexoPOS doesn’t include build assets, it should be compiled using Node.js. This means after the installation is complete, the following command should be executed within the created folder “nexopos”.
npm installnpm run prod
These two commands will install NexoPOS 4.x javascript libraries and build them. The process might take some time according to internet speed.
How To Install NexoPOS 4.x
The next step is to proceed with the installation on the database. this is explained in this tutorial, which details the installation wizard for NexoPOS 4.x.
Today starts a list of tutorials that shares progress on NexoPOS 4.x development. As some features haven’t been covered already a summary should come up very soon. In today’s progress, orders management has been improved from the POS and here are the details.
Why Managing Orders From POS ?
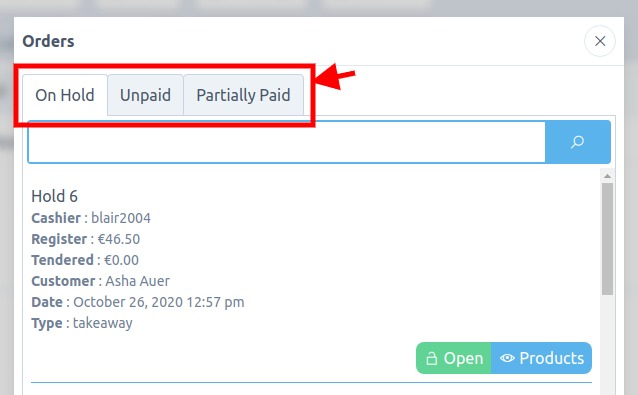
The idea to managing orders from the POS is mainly to process many orders at the time. For a scenario of a grocery store, this means being able to hold orders and process new other without loosing previous records. Meanwhile, 3 type of orders can be handled from the popup :
Hold Orders (which doesn’t affect the stock)
Unpaid Orders (which products are deducted from the stock)
Partially Paid Orders (same as unpaid but has received a partial payment).
Paid orders can’t be managed from the orders popup as these orders aren’t likely to receive further products or payments.
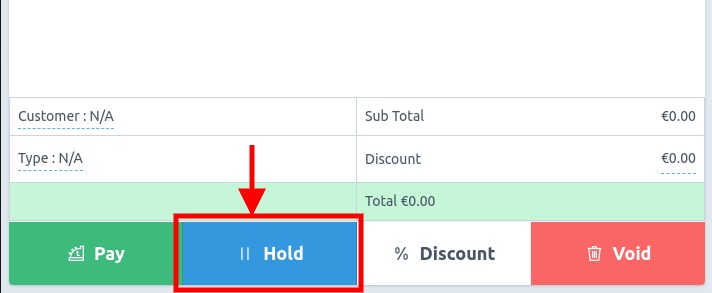
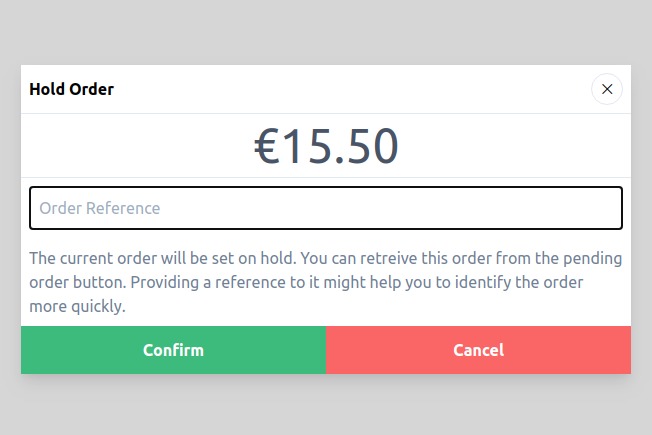
How To Hold An Order On NexoPOS 4.x
While proceeding to order, there is a button at the bottom of the cart. That button actually triggers the popup that should save the order as “hold”.
If some required information, such as the customer and the order type isn’t defined, new popups requesting this information might open.
While saving the order, a title might be provided for a quick reference, but it’s not mandatory.
How To Retreive Hold Orders On NexoPOS 4.x
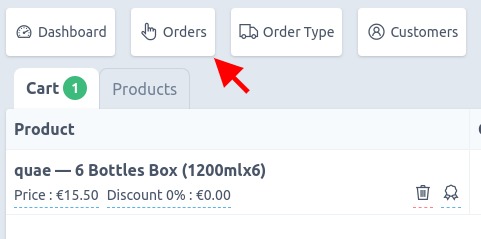
The process to retrieve an order is as easier as it is to hold orders. While on the POS, there are various buttons on the top from which you can find the “Orders” button.
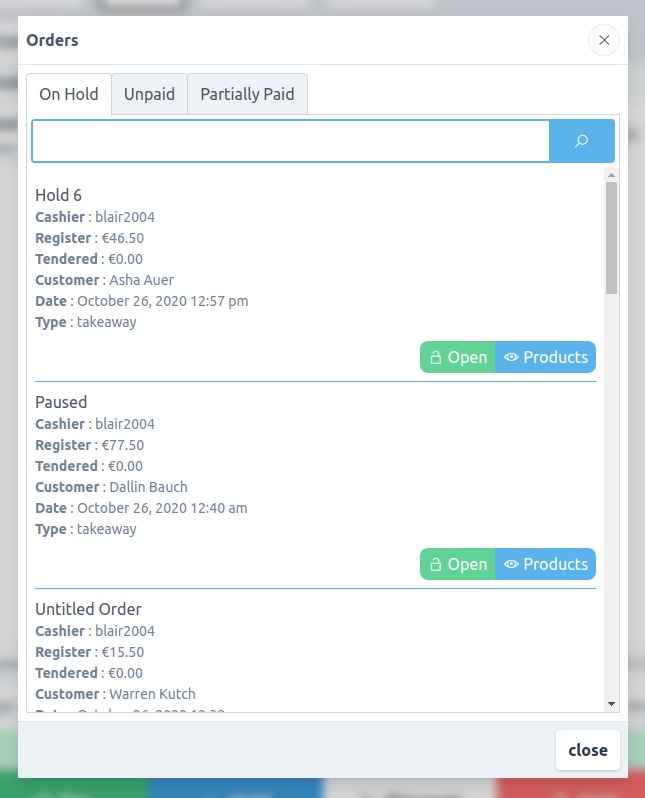
This popup opens a popup that shows orders according to their payment status. As mentioned earlier, there is 3 payment status supported: Hold, Unpaid & Partially Paid.
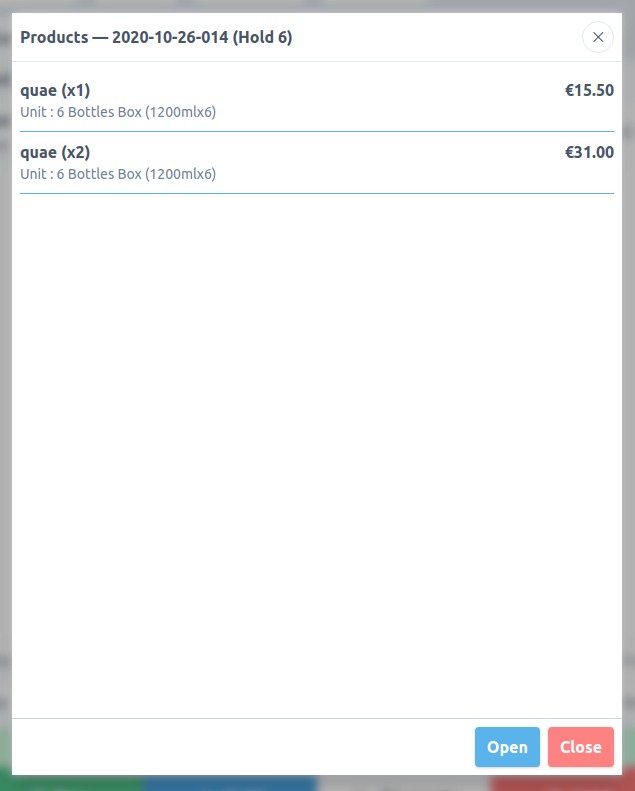
Each result has “Open” and “Products” buttons. The “Open” buttons load the order on the cart and “Products” shows a list of products added to the order.
Before opening an order, if there is an ongoing order on the cart, a confirmation popup will request the user approval before erasing the order ongoing.
What Happens Behind The Scene
When an order is saved, it creates a new record to the database. While that order is retrieved, the attribute “id” is used to let the POS knows the provided resource has a reference on the database. Therefore, while processing the order, it treats the order as an already saved order (thus doesn’t create new database records).
Today starts the official website for NexoPOS 4. You might have already heard that NexoPOS 4 is on the way and that’s right. Here, you’ll find everything useful either for the end-users or the developers in order to enrich the experience using NexoPOS 4.
On a frequent basis, progress and dev-tips are posted in order to keep people informed on the changes and progress.
Why NexoPOS 4 ?
NexoPOS 3.x has been released 4 years ago. Since that time, no major update has been released to solve major common issues. In 2018, NexoPOS 4 has started by, the decision about the technology to use wasn’t set. A prior version has been made using Node.js and Angular to create a native application with Electron.js, but the architecture wasn’t satisfying enough and there was no clear way to have an online and offline solution with that. After 1 year of serious investigations, Laravel, Vue, and TailwindCSS have been selected to power NexoPOS 4.
NexoPOS 4 is a complete rebuilt of NexoPOS from scratch only using the experiences and the customers’ expectations get from NexoPOS 3.x. The idea here is to solve major concerns faced with NexoPOS 3 that is “scalability” & “stability”. Moreover, NexoPOS 4 aims to be a real pluggable application, that can be extended by anyone having development skills.
Where is NexoPOS 4 Now ?
NexoPOS 4 is a new project, that requires times, involvement and passion. The project has started in July 2020 and it’s close to having a first beta version. However, at launch NexoPOS 4.x won’t have all the features that NexoPOS 3.x has (note that NexoPOS 3.x has been since 4 years maintained to reach his current level). But gradually, it will be implemented.
The minimum features planned to be released are those useful to manage a stock and the store along with related expenses (charges). With the work ongoing, the first beta version should be ready on early December 2020 or maybe before.
Your Contributions Are Welcome
NexoPOS 3.x has made his way that far thanks to contributions. Most of the improvements that have been added were initially shared as an idea. You’re therefore invited to share your ideas on Github. You can also already download NexoPOS and just give it a try to see where it is. There is a tutorial available that should guide you on how to install NexoPOS on Windows 10. More tutorials are about to be released here. But you can also test the demo online if you don’t want to install it now.
An important note is to be taken on the type of contributions. As contributions are welcome, not all a subject of approval. The contributions are expected to share ideas that aren’t specific to a country or a judicial system. These could lead to a specific customization.